

How to use a fire pit
Imagine you've finally gathered the family for a night under the stars, but instead of a golden glow, your backyard is filled with a thick wall of acrid smoke that's heading straight for the neighbour's window. Learning how to use a fire pit properly is about more than just striking a match; it's about creating a warm, inviting atmosphere without the stinging eyes or the constant battle with damp timber. It's a common frustration for many Aussies who want that campfire magic but end up with nothing more than a smouldering heap and a ruined patch of lawn.
We understand that you want to enjoy your outdoor space without the stress of breaking local council fire bans or accidentally scorching your expensive decking. This guide will help you master the art of the perfect backyard fire, from choosing the best seasoned Aussie hardwoods to ensuring your setup is completely safe and legal. You'll discover how to achieve a roaring, low-smoke flame and even how to transition into a successful BBQ feast on the coals using versatile designs like the Bakyard Omnipit. We'll walk you through the essential safety checks, the best lighting techniques, and how to shut everything down properly so you can sleep soundly after a brilliant night outdoors.
Key Takeaways
- Learn how to navigate local council regulations and choose the safest spot in your backyard to avoid damaging your lawn or decking.
- Discover the "Top-Down" lighting method and why selecting seasoned Aussie hardwoods is the secret to mastering how to use a fire pit without the smoke.
- Pick up pro tips for managing airflow and using a poker to keep your fire roaring and healthy all night long.
- Find out how to transition from a warming fire to a professional BBQ setup by waiting for the perfect "white ash" stage.
- Understand the safest ways to extinguish your fire and dispose of ash without risking damage to your high-quality steel fire pit.
Preparation and Safety: Before You Strike a Match
The excitement of a crisp evening spent outdoors often leads people to rush straight into lighting their first log. However, learning how to use a fire pit effectively starts long before the first spark. While the history of fire pits shows we have been gathering around communal flames for millennia, modern suburban living requires a bit more finesse than a simple hole in the dirt. Proper preparation ensures your night is remembered for the laughs and roasted marshmallows, not for a visit from the local fire brigade or a scorched patch of expensive buffalo grass.
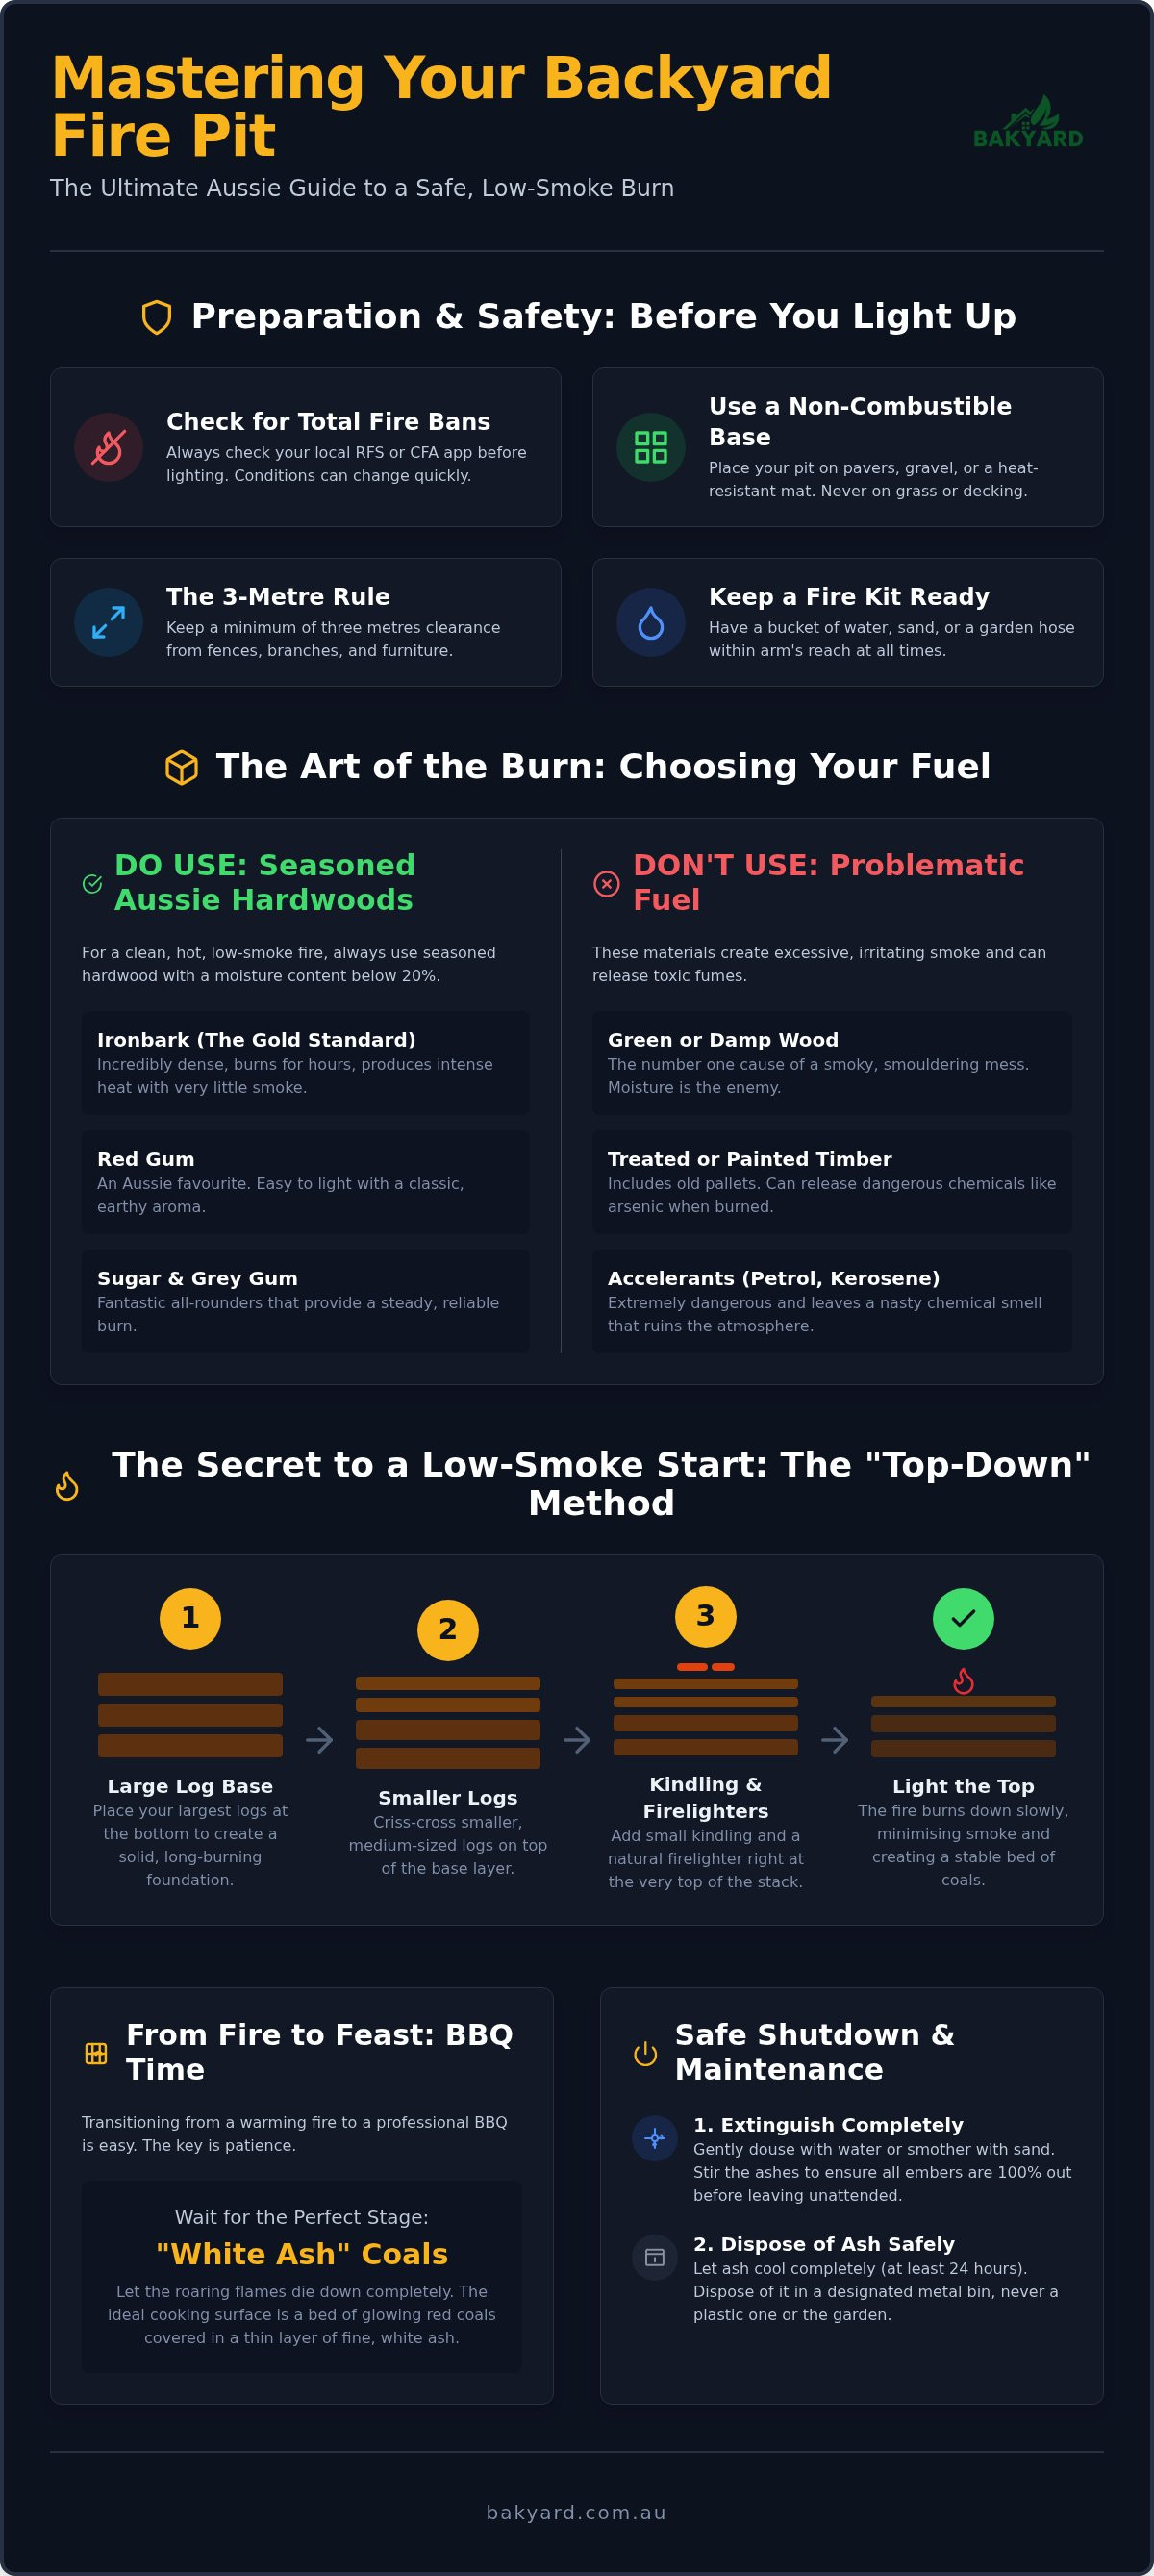
Your first priority is a solid safety foundation. Follow these non-negotiable steps before you even reach for the kindling:
- Check for Total Fire Bans (TFB): Never assume it is safe to burn just because the sun has gone down. State authorities can declare bans at any time during the summer months.
- Select the right surface: Always place your unit on a level, non-combustible base like pavers, gravel, or a dedicated heat-resistant fire mat.
- Observe the 3-metre rule: Ensure there is at least a three-metre clearance from any overhanging branches, wooden fences, or outdoor furniture.
- Prepare your fire kit: Keep a bucket of water, a bag of sand, or a connected garden hose within arm's reach at all times.
Understanding Australian Fire Bans and Rules
Living in Australia means respecting the power of fire. It's essential to check the RFS or CFA apps daily to see the current fire danger rating in your specific zone. Even if a TFB isn't in place, you must be aware of "nuisance smoke" regulations. In many Australian suburbs, your neighbours have a right to enjoy their own yards without being choked by thick smoke. If your fire is poorly managed and creates excessive fumes, you could face complaints or fines. This is where a high-quality, commercially produced Bakyard fire pit offers a massive advantage over DIY setups. These units are designed for better airflow, which leads to a cleaner, more efficient burn that keeps the smoke to a minimum and your neighbours happy.
Positioning Your Pit for Maximum Safety
The Art of the Burn: Selecting Fuel and Lighting Up
Choosing the right fuel is the most important decision you'll make when learning how to use a fire pit. If you grab whatever is lying around the garden, you'll likely end up with a smouldering mess. The golden rule is simple: moisture is the enemy. Green wood or freshly cut timber is packed with sap and water, which creates thick, white smoke as it struggles to burn. You want seasoned hardwood with a moisture content below 20%. This ensures a clean, efficient burn that provides maximum warmth with minimal irritation to your eyes or your neighbours' laundry.
Stay away from treated pine, painted timber, or old pallets. These often contain chemicals like arsenic or lead that release toxic fumes when heated. Stick to natural firelighters made from wood shavings or wax instead of petrol or kerosene. Using accelerants is dangerous and leaves a nasty chemical stench that ruins the outdoor experience. For a truly professional setup, following established campfire safety guidelines helps keep the flames contained and manageable from the very first spark.
Best Australian Hardwoods for Your Fire Pit
Australia is home to some of the world's best firewood. If you want the ultimate experience, look for these species:
- Ironbark: This is the gold standard. It is incredibly dense, burns for ages, and produces intense heat with very little smoke.
- Red Gum: A favourite across the country. It is easy to light and gives off that nostalgic, earthy aroma we all love.
- Sugar Gum and Grey Gum: These are fantastic all-rounders. They provide a steady, reliable burn that doesn't require constant prodding.
Step-by-Step: Lighting the Perfect Fire
While the classic "tepee" method is popular, the "Top-Down" method is the secret to a low-smoke start. It works by lighting the small kindling on top of the larger logs. This allows the heat to radiate downwards and pre-heat the fuel below, burning off gases before they turn into smoke. Here is how to nail it in your wood fire pit:
- Place two large, seasoned logs parallel at the base of the pit.
- Layer smaller pieces of kindling in a cross-hatch pattern on top of those base logs.
- Tuck two or three natural firelighters into the kindling layer and light them up.
- As the kindling burns down, it will ignite the larger logs below. Gradually add more split hardwood once the base is glowing red.
Mastering this technique takes the guesswork out of how to use a fire pit and lets you focus on the company. If you're looking to upgrade your backyard setup, a durable steel unit is the perfect place to start your fire-craft journey.
Once your flames are dancing, the real fun begins. However, many people make the mistake of thinking a fire is "set and forget". Learning how to use a fire pit like a pro means understanding that a fire is a living thing that needs to breathe. If you simply stack log upon log, you'll eventually "choke" the flames by cutting off oxygen. You'll know your fire is struggling if the bright orange flames turn into thick, lazy grey smoke. To fix this instantly, use a poker to create gaps between the logs. This allows air to circulate from the bottom of the pit up through the fuel, reigniting the combustion process. Modern steel units, like those in the Bakyard range, often feature integrated airflow vents. These are designed to pull oxygen into the base of the fire, which helps maintain a much cleaner burn than a traditional hole in the ground. By keeping these vents clear of excessive ash buildup, you ensure the "heart" of the fire stays white-hot. This is the secret to a long-lasting, low-smoke evening that won't leave your clothes smelling like a bushfire the next morning.The Secret to a Smokeless Experience
If you find yourself constantly dodging clouds of smoke, remember that "more wood" is rarely the answer. In fact, adding too much fuel at once can drop the core temperature and cause smouldering. Always prioritise split logs over round ones. Split timber has more surface area and exposed fibres, which catch alight much faster than a solid round log. If you spot a specific log that is black and smoking rather than flaming, don't be afraid to reposition it. It is usually a sign the wood hasn't seasoned properly or is sitting in a "dead spot" without enough air to stay lit.
Stoking and Refuelling Etiquette
Timing is everything when you're keeping the vibe going. You should aim to add a new log when the previous ones have broken down into a glowing bed of red-hot coals, but before the actual flames have vanished. This ensures the new fuel ignites almost instantly. Use a quality fire tool set to safely move embers toward the centre, creating a concentrated heat source. This "coal bed" provides the most consistent warmth, so don't be too eager to poke it into nothingness. A well-managed coal bed is also the perfect foundation if you're planning to transition into cooking later in the night.
The 2-in-1 Advantage: Transitioning to BBQ Cooking
Once you've mastered the coal bed, you've unlocked the potential for a genuine backyard feast. Many beginners wonder exactly how to use a fire pit for cooking without burning their dinner to a crisp. The secret lies in patience. You must wait for the "white ash" stage. This occurs when the roaring flames have subsided and the logs are covered in a fine layer of white-grey ash, indicating a steady, radiant heat source. Cooking over active flames often results in soot-covered meat and a bitter taste, whereas embers provide that perfect, controlled temperature for a gourmet finish.
For those who value versatility, the 2-in-1 fire pit and BBQ design of the Bakyard Omnipit is a game changer. It allows you to pivot from a social gathering to a gourmet cookout in minutes. Unlike basic fire bowls, these units feature adjustable grill plates. Being able to change the height of your grate is essential; you'll want it closer to the coals for searing a rib-eye and further away for slow-roasting veggies or keeping snags warm. Always ensure you give the grate a good scrub with a wire brush before and after use to keep things hygienic and prevent old fats from smoking out your fresh ingredients.
Cooking Over Wood vs Charcoal
Using seasoned Aussie hardwoods like Ironbark adds a distinct, smoky depth to your food that a gas BBQ simply can't match. If you're planning a long, "low and slow" roasting session, you might supplement your wood with some high-quality lump charcoal. This helps maintain a consistent temperature for hours. Be mindful of "fat flare-ups" when grilling fatty cuts like lamb chops. If the fat drips and ignites, simply move the meat to a cooler part of the grill until the flames settle. This prevents the "charred on the outside, raw on the inside" result that plagues many first-time fire cooks.
Essential Tools for Fire Pit BBQing
Safety is paramount when working over hot coals. Invest in a pair of long-handled tongs and welding-style heat-resistant gloves to protect your forearms. You aren't limited to just grilling on the grate, either. A seasoned cast iron skillet placed directly on the grill is perfect for frying eggs or caramelising onions for your burgers. By arranging your coals to one side, you create different heat zones. This lets you cook delicate seafood on the "cool" side while charring your steaks on the "hot" side. Mastering these zones is the final step in learning how to use a fire pit as a complete outdoor kitchen.
Ready to elevate your outdoor cooking? Browse the Bakyard 2-in-1 fire pit and BBQ collection to find the perfect centrepiece for your next backyard gathering.
Safe Shutdown and Maintenance: Caring for Your Pit
The best part of the night is winding down with a final drink as the flames settle, but knowing how to use a fire pit safely doesn't end until the last ember is stone cold. Many people are tempted to pour a bucket of water over the coals to finish the night quickly. While this seems logical, it is actually the worst thing you can do for your equipment. Dousing hot steel with cold water causes "thermal shock", which can lead to warping or even permanent cracks in the metal. Instead, the "Let it Burn Out" method is the gold standard for maintaining the integrity of your pit.
When you're ready to call it a night, stop adding fuel about an hour before you plan to head inside. This allows the logs to break down naturally into a manageable bed of ash. If you need to speed up the process, use your poker to spread the embers out across the base of the pit. This increases the surface area and allows the heat to dissipate much faster than if the coals were piled in a heap. Even when the fire looks "dead", those coals can stay hot enough to reignite for hours, so never leave your yard until you're certain the heat has subsided.
Extinguishing the Fire Safely
The safest way to shut down your fire is by using a snug-fitting metal lid. This starves the fire of oxygen and prevents any stray sparks from blowing onto your lawn or decking overnight. If you don't have a lid, stay with the pit until the glow has faded to a dull grey. Once the ash is completely cold, which usually takes a minimum of 24 hours, you can safely dispose of it. Cold ash is actually great for the garden in small amounts, but always double-check there are no hidden hot spots before you move it into a bin or garden bed.
Long-Term Care for Steel Fire Pits
Australian coastal air can be tough on metal, so a little bit of maintenance goes a long way. Ash is hygroscopic, meaning it sucks moisture out of the air like a sponge. If you leave damp ash sitting in your pit for weeks, it will accelerate corrosion and rust. Make it a habit to scoop out the cold ash after every few uses. For units like the Bakyard wood fire pit, applying a light coat of vegetable oil to the bowl after a clean-out acts as a protective barrier against the elements.
If you're using a portable model like the Bakyard FireFlex, consider storing it in a dry shed or garage during the off-season. For larger, permanent setups, a high-quality weather-proof cover is essential. It keeps the rain out and ensures that when the next crisp evening rolls around, your pit is dry, seasoned, and ready for another round of campfire magic. Mastering how to use a fire pit is easy when you treat your gear with the same respect you show the fire itself.
Ready to Master Your Backyard Fire?
Mastering the basics of fire-craft transforms a simple evening into an unforgettable experience. You now have the skills to navigate local regulations, select the perfect Ironbark logs, and manage a clean burn that keeps the neighbours happy. By understanding how to use a fire pit correctly, you're not just lighting a flame; you're creating a focal point for connection and incredible outdoor meals. The secret always lies in the details, from choosing seasoned timber to the final safe shutdown once the coals are cold.
If you're looking for the ultimate setup, upgrade your backyard with a Bakyard Omnipit 2-in-1 Fire Pit & BBQ today! Every unit is designed for the Aussie backyard lifestyle and comes with a one-year Australian warranty for your peace of mind. We also provide free shipping Australia-wide from our Sydney warehouse to help you get started sooner. Grab your tongs, gather the family, and get ready to enjoy the golden glow of a perfect fire tonight.
Frequently Asked Questions
Can I use a fire pit on a wooden deck in Australia?
You can use a fire pit on a wooden deck only if you place it on a dedicated heat-resistant fire mat or a stable base of non-combustible pavers. Placing a hot steel unit directly on timber will cause scorching or even ignition. Ensure your fire pit has high legs or a heat shield to provide a significant air gap between the base and your decking boards.
What is the best wood for a fire pit in Australia to avoid smoke?
Ironbark is the premier choice for Australian fire pits because its high density leads to a very clean, low-smoke burn. Seasoned Red Gum is also a fantastic option for a classic aroma. To avoid excessive smoke, always ensure your timber has been seasoned for at least 12 to 24 months to reach a moisture content below 20 per cent.
Do I need council approval to have a fire pit in my backyard?
Most Australian councils do not require formal approval for portable fire pits, provided you aren't creating "nuisance smoke" for your neighbours. However, rules can vary significantly between local government areas, especially in high-density suburbs. It is always best to check your specific council website for bylaws regarding backyard burning and smoke abatement.
How do I stop my fire pit from rusting?
The best way to prevent rust is to remove cold ash promptly and apply a light coat of high-heat vegetable oil to the steel bowl. Ash absorbs moisture from the air, which accelerates corrosion against the metal surface. Using a weather-proof cover and storing portable units in a dry shed during winter will also extend the life of your pit.
Can I use a fire pit during a Total Fire Ban?
No, you are strictly prohibited from using any wood-burning or solid-fuel fire pit during a Total Fire Ban (TFB). These bans are legally enforced to prevent bushfires during periods of extreme heat and wind. Check the RFS or CFA apps every morning during the summer months to see if a TFB has been declared for your region.
What is the "Top-Down" fire lighting method?
The "Top-Down" method involves placing your largest logs at the bottom of the pit and layering kindling and firelighters on the very top. Lighting the fire from the peak allows the heat to radiate downwards, which pre-heats the fuel and burns off smoke-causing gases. This is the most efficient way to learn how to use a fire pit without creating a thick cloud of smoke.
How far away should a fire pit be from my house?
You should maintain a minimum distance of three metres between your fire pit and any structures, including your house, fences, or sheds. This clearance should also apply to overhanging branches and garden shrubs. Keeping this "safe zone" clear ensures that stray embers or shifting winds don't accidentally ignite combustible materials on your property.
Is it safe to cook food over a wood fire pit?
It is completely safe to cook over a wood fire as long as you use natural, untreated hardwoods like Ironbark or Red Gum. Never cook over treated pine, painted timber, or old pallets, as these release toxic chemicals into your food. For the best flavour, wait until the wood has burnt down to a bed of glowing white ash before you start grilling.