

Fire Pit BBQ Cooking: The Ultimate Aussie Guide 2026
What if your backyard fire pit could do more than just keep your toes warm on a crisp evening? Most Aussies love the atmosphere of an open flame, but the idea of actually cooking a full meal over it can feel like a bit of a gamble. You've likely felt the frustration of meat that's charred black on the outside while staying stubbornly raw in the middle. When you're staring at those glowing coals and wondering exactly what to cook on a fire pit bbq, it's tempting to just stick to basic snags and hope for the best.
It's time to trade that uncertainty for total confidence at the barbie. We'll show you how to master your 2-in-1 fire pit and turn every weekend gathering into a genuine gourmet feast. You'll discover the secrets of heat zones, find out why Ironbark is the king of cooking timbers, and learn the difference between direct grilling and slow coal-roasting. From smoky mains to fire-kissed desserts, we're providing the ultimate roadmap to help you get the absolute most out of your Bakyard setup.
Key Takeaways
- Master the transition between direct grilling and coal-roasting to ensure your food is juicy on the inside and perfectly seared on the out.
- Discover exactly what to cook on a fire pit bbq to impress your mates, from premium wood-fired ribeye to gourmet twists on the classic Aussie snag.
- Learn why choosing the right Australian hardwood like Ironbark or Red Gum is the secret to achieving that authentic smoky flavour.
- Expand your repertoire with simple 'set and forget' sides like traditional damper and decadent desserts cooked directly in the glowing embers.
The Versatility of the 2-in-1 Fire Pit BBQ
A 2-in-1 fire pit BBQ is the ultimate outdoor multi-tasker. It serves as a warming centrepiece for your deck and a high-performance kitchen all at once. While the global history of barbecue shows we've been cooking over open flames for centuries, modern design has made the process much more approachable for the average backyard chef. Instead of juggling a separate fire pit and a bulky gas barbie, units like the Bakyard Omnipit combine everything into one sleek, functional unit. This is a massive win for Australian backyards where we want to maximise our living space without the clutter of multiple appliances.
The real magic happens in the social connection these units create. Unlike a traditional grill where the cook is often tucked away in a corner, a fire pit BBQ invites everyone to gather around the warmth. Your mates can stand by with a cold drink, watching the flames and chatting while the dinner sizzles. It turns a simple meal into an interactive experience. When you're deciding what to cook on a fire pit bbq, remember that you aren't just limited to the grill plate. You can roast directly in the coals or use the ambient heat to slow-cook sides, making the most of every log you burn.
Grill Plate vs. Open Flame: Know Your Zones
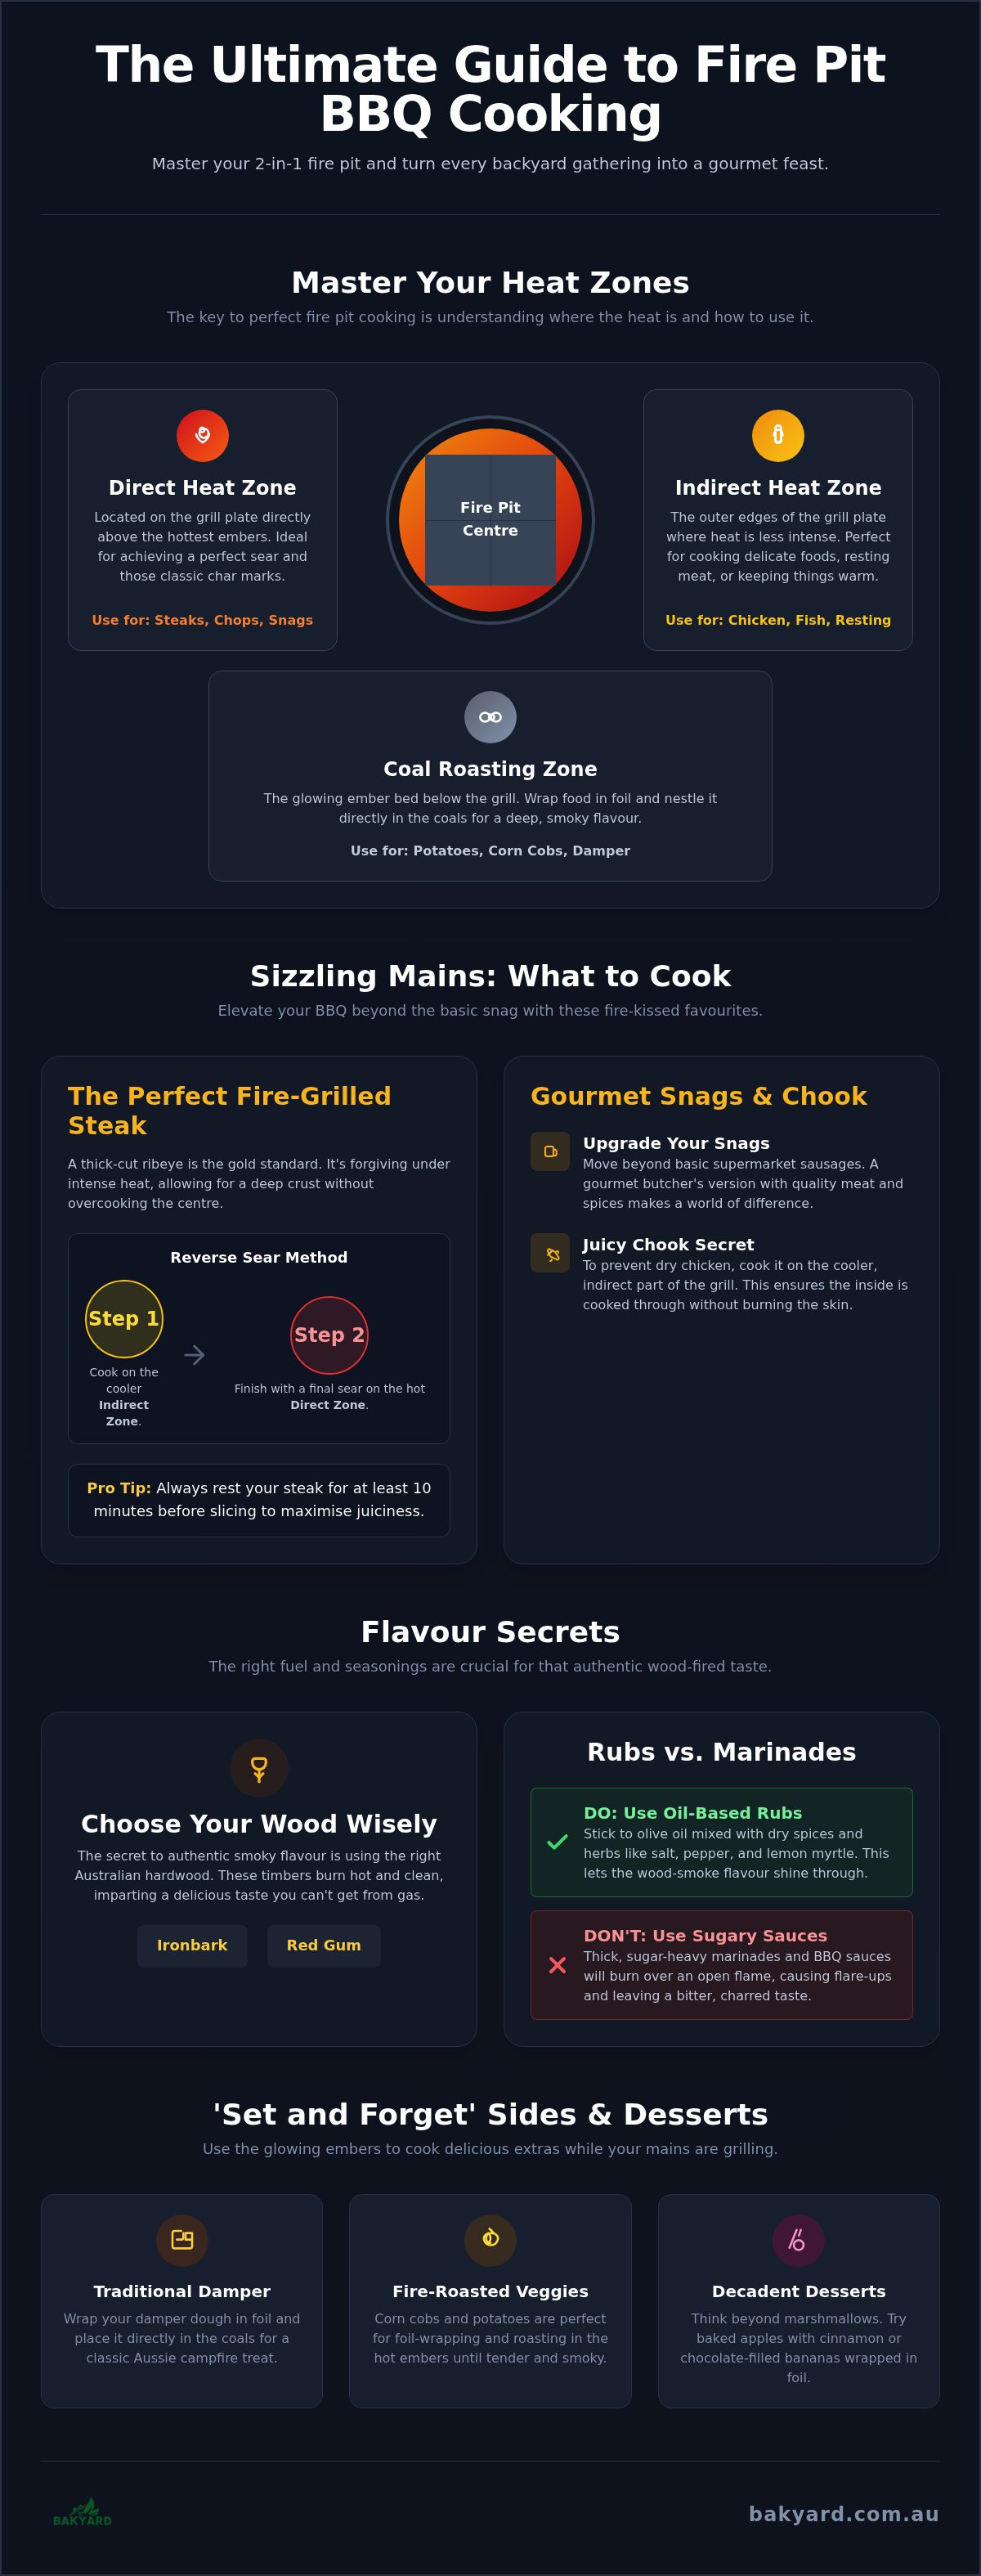
Mastering your heat zones is the first step toward becoming a fire pit pro. The stainless steel grill plate provides direct heat, which is essential for searing steaks and getting those iconic char marks on your snags. However, the ember bed below is just as useful. This area provides a steady, radiant heat that's perfect for "set and forget" cooking. You can wrap corn cobs or potatoes in foil and nestle them right into the glowing coals for a deep, smoky flavour you just can't get from a gas burner.
If you're planning what to cook on a fire pit bbq for a larger group, use the outer edges of the grill as an indirect heat zone. This cooler area is perfect for letting meat rest after searing or keeping your first batch of damper warm. By moving food between these zones, you gain total control over the cooking process, ensuring nothing ends up charred on the outside while remaining raw in the middle.
Essential Gear for Fire Pit Chefs
You don't need a massive shed full of tools, but a few specific items will make your life much easier. High-quality, long-handled tongs are a non-negotiable. They give you the reach to flip meat without singeing your arm hairs. Heat-resistant gloves are another smart addition, especially when you need to adjust the grill plate or shift a heavy log to manage the flame height. A sturdy, adjustable grill plate is the heart of the system. It allows you to raise or lower your food depending on the intensity of the fire. This 2-in-1 setup is a fantastic space-saver for smaller Aussie backyards, giving you professional results without the need for a massive outdoor kitchen installation.
Sizzling Mains: Best Meats for the Fire Pit Grill
While the humble 'snag on a stick' is a nostalgic campfire classic, your 2-in-1 setup allows for much more sophisticated results. Moving from a basic supermarket sausage to a gourmet butcher's version is the easiest way to elevate your next gathering. When you're deciding what to cook on a fire pit bbq, the quality of the meat and the way you manage the flames are your two most important variables. Understanding the different methods of live-fire cooking is essential for moving beyond basic grilling to professional-tier results. For chicken, or 'chook' as we call it, the secret to juiciness is using the indirect heat zones on the edge of your grill to prevent the skin from burning before the inside is done.
A thick-cut ribeye is the gold standard for wood-fired cooking. Thicker cuts are more forgiving under the intense heat of a fire pit, allowing you to develop a deep, dark crust without overcooking the centre. Try the 'reverse sear' method by starting your steak on the cooler outer edge of the grill until it reaches your desired internal temperature. Once it's close, move it directly over the hottest part of the embers for a final, sixty-second blast of heat. Always let your meat rest away from the fire for at least ten minutes; this allows the juices to redistribute for maximum tenderness.
Skewers and Kebabs: The Social Way to Grill
Skewers are a fantastic way to feed a crowd while keeping things interactive. Lamb paired with fresh rosemary sprigs offers a classic Aussie flavour profile that benefits immensely from a bit of char. To ensure everything cooks evenly, try to keep your protein and vegetable sizes consistent on the stick. Metal skewers are significantly safer than bamboo options over a fire pit because they won't catch alight or snap under the weight of heavy proteins. They also help conduct heat into the centre of the meat, speeding up the cooking process and keeping your guests happy.
Aussie Classics: Damper and Fire-Roasted Sides
While the meat often takes centre stage, a true fire pit feast is defined by the sides. Most people struggle with timing their whole meal, but the secret lies in "one-pit" planning. You can use the different heat zones to cook your entire dinner at once. While your steaks are searing on the grill plate, your sides can be tucked away in the embers or resting on the cooler edges. When you are stuck for ideas on what to cook on a fire pit bbq, looking toward traditional Australian bush tucker and classic campfire staples is the best way to fill your plate.
Corn on the cob is a fantastic example of a simple side made better by an open flame. A pro move is to keep the husks on while cooking. Soak the whole cobs in water for ten minutes first, then place them directly on the grill. The damp husks steam the corn inside, keeping it juicy while adding a subtle smoky aroma. For greens like asparagus or broccolini, a quick thirty-second char over the high-heat centre of the fire brings out a natural sweetness that a kitchen stove simply cannot replicate.
How to Make Authentic Fire Pit Damper
The bed of embers is basically a natural oven. It is the perfect place for "set and forget" sides like a foil-wrapped potato bake or whole sweet potatoes. If you're doing a potato bake, slice your spuds thin, add plenty of garlic butter and a splash of cream, then double-wrap the parcel in heavy-duty foil. For the best results, you need a decent bed of coals. High-quality Bakyard Fire Pits are designed with enough depth to maintain a thick layer of embers, which is essential for roasting whole pumpkins or sweet potatoes directly in the heat. Just scrub the skins, wrap them up, and let the fire do the hard work for about forty-five minutes. The result is a soft, buttery interior with a flavour profile that's worlds away from a standard oven roast.
Sweet Finishes: Desserts Over the Embers
Once the steaks are finished and the fire has settled into a gentle, glowing bed of coals, it's time for the best part of the evening. Most people think outdoor cooking stops at the savoury course, but knowing what to cook on a fire pit bbq for dessert is the secret to a truly legendary backyard gathering. The residual heat from your embers is a precious resource. It's perfect for slow-melting chocolate and caramelising fruit sugars without the intense flare-ups of a fresh flame.
You can easily elevate the humble toasted marshmallow by creating gourmet s'mores using chocolate-coated Aussie biscuits. Instead of a plain cracker, use a chocolate-topped digestive to skip a step and add a bit of luxury. For a mess-free option that the kids will love, try campfire dessert cones. Simply fill waffle cones with chocolate chips, mini marshmallows, and berries, wrap them in foil, and stand them on the grill for five minutes. It's an interactive way for everyone to join in the fun without the sticky fingers.
The Ultimate Aussie Banana Boat
This dessert is a campfire classic that works perfectly on a modern fire pit. Take a whole banana with the skin still on and slice it lengthways through the curve, being careful not to cut through the bottom layer of skin. Stuff the opening with dark chocolate buttons, crushed macadamias, and a few marshmallows. Wrap the banana tightly in a double layer of heavy-duty foil to prevent any sticky leaks as the ingredients melt together. Place it directly on the embers for ten minutes until the fruit is soft and the chocolate is gooey. Serve it with a generous dollop of thickened cream for a rich, satisfying finish.
Fruit on the Grill
Fruit thrives under high heat. Thick rings of fresh pineapple or halved peaches develop a deep, smoky sweetness when they hit the hot grill plate. When you're deciding what to cook on a fire pit bbq, don't overlook the potential of seasonal stone fruit. The Maillard reaction is the chemical process where heat transforms the sugars and amino acids in the fruit to create complex new flavours and a beautiful browned crust. This caramelisation pairs beautifully with a scoop of cold vanilla bean ice cream. If you're ready to master the art of outdoor dining from start to finish, the Bakyard Omnipit offers the versatility you need to cook every course with ease.
Mastering the Heat: Wood Choice and Flavour
The secret to a perfect wood-fired meal isn't just the recipe. It's the fuel you put in the belly of your fire pit. Choosing the right timber is as important as deciding what to cook on a fire pit bbq. While it's tempting to throw in any old scraps, seasoned hardwood is the only choice for a safe and delicious barbie. Softwoods like pine are full of resin that creates a bitter, sooty taste. Worse still, treated timber contains toxic chemicals that should never get near your food. Stick to local hardwoods for a clean burn and consistent heat.
Managing your 'ember bed' is the final piece of the puzzle. You shouldn't start cooking the moment the flames are licking the grill. Instead, wait for the wood to break down into a thick layer of glowing red coals. This provides the steady, radiant heat needed for everything from searing steaks to slow-roasting damper. It's this bed of embers that gives you the control you need to ensure your food is cooked through without being scorched by an erratic flame.
Australian Hardwoods for the Best Aroma
Each Australian timber brings a unique character to your cooking. Ironbark is the gold standard for many pitmasters. It burns hot and slow, creating a long-lasting bed of coals with a subtle smoke that won't overpower your ingredients. If you want a classic, bold smoke flavour for red meats, Red Gum is your best bet. It produces a heavy, aromatic smoke that's iconic to the Australian bush. For more delicate items like fish or poultry, Sheoak provides a lighter, sweeter profile that complements the protein without dominating it.
Temperature Control Without a Dial
You don't need a digital thermometer to manage your heat levels. The 'hand test' is a reliable, old-school way to gauge the temperature above the grill plate. Carefully hold your palm about twelve centimetres above the grill. If you can only keep it there for two seconds, it's high heat. Five seconds indicates a medium heat, while ten seconds is perfect for low and slow cooking.
You can also create distinct heat zones on your Omnipit by shifting the coals. Pile them high on one side for intense searing and leave a thinner layer on the other for indirect cooking or resting meat. Once you're finished, never leave the fire to smoulder. Extinguish it safely with water or sand to ensure your backyard stays safe and ready for the next weekend feast.
Ready to Fire Up Your Next Backyard Feast?
Mastering the dual-zone heat of a 2-in-1 unit and choosing the right hardwood like Ironbark are the absolute keys to success. Whether it's a perfectly seared ribeye or a crusty batch of traditional damper, the possibilities for your outdoor menu are practically endless. Knowing exactly what to cook on a fire pit bbq transforms a simple evening fire into a full culinary experience that brings mates and family together. You don't need a professional kitchen to achieve gourmet results; you just need the right gear and a bit of confidence with the glowing embers.
If you're ready to take your outdoor entertaining to the next level, our equipment is designed for the rugged Aussie climate and built to handle the heat. We offer a one-year Australian warranty and free shipping Australia-wide, so you can start your live-fire journey with total peace of mind. Upgrade your backyard with a Bakyard 2-in-1 Fire Pit & BBQ today! It's time to light the fire, grab the tongs, and start creating unforgettable memories in your own backyard.
Frequently Asked Questions
Can I use charcoal instead of wood in my fire pit BBQ?
Yes, you can absolutely use charcoal in your 2-in-1 unit. Charcoal is excellent for maintaining a consistent, high temperature without the flare-ups often associated with fresh wood. Many pitmasters use a mix of both; they start with a charcoal base for steady heat and add Australian hardwoods like Ironbark for that authentic smoky aroma. It's a great way to ensure your dinner stays on track while still getting those classic fire-kissed results.
How do I clean the grill plate on my fire pit after cooking?
The easiest way to clean your grill plate is while it's still warm. Use a sturdy wire brush or a scraper to remove any stuck-on bits immediately after you've finished serving. Once it's cool, give it a quick wipe with a damp cloth and apply a light coating of vegetable oil to prevent rust. Taking a few minutes to do this after every barbie will keep your stainless steel plates in top condition for years.
Is it safe to cook on a fire pit during a total fire ban?
No, you cannot use an open-air fire pit during a total fire ban in Australia. On these days, all open fires are prohibited to prevent bushfires, and this includes wood-fired or charcoal BBQs. It's essential to check with your local council or state fire authority before lighting up. Safety is the number one priority, so it's best to stick to your indoor kitchen until the fire ban is lifted and conditions improve.
What is the best way to prevent food from sticking to the grill?
Preventing food from sticking starts with a hot grill and a bit of oil. Make sure your plate is fully pre-heated before you lay down your meat. Lightly oil the food rather than the grill to reduce flare-ups and smoke. If you're wondering what to cook on a fire pit bbq without the mess, remember to let the meat sear properly before trying to flip it; it'll naturally release once a crust has formed.
Do I need to season my fire pit grill plate before the first use?
Yes, you should definitely season your grill plate before its first use. This involves heating the plate and applying a thin layer of high-smoke-point oil, like canola or grapeseed, then letting it burn off. This process creates a protective, non-stick patina that gets better with every cook. It's a simple step that helps protect the metal from the elements and makes your future clean-up jobs much easier and faster.
Can I cook a whole roast chicken on a 2-in-1 fire pit?
You certainly can cook a whole roast chicken on a 2-in-1 fire pit. The best method is to use indirect heat by pushing your coals to the sides and placing the 'chook' in the centre of the grill. Alternatively, you can use a cast-iron Dutch oven placed directly in the embers for a succulent, oven-style roast. It's an impressive way to show off your fire pit skills during a weekend backyard gathering.
How long should I wait for the fire to burn down before I start cooking?
You should generally wait about thirty to forty-five minutes for your logs to burn down into a thick bed of glowing embers. Cooking over active flames often leads to burnt outsides and raw insides. Once the wood has stopped flaming and is covered in a layer of grey ash, you've reached the perfect temperature. This steady, radiant heat is exactly what you need for consistent results when deciding what to cook on a fire pit bbq.
What should I do if the fire gets too hot for the meat?
If the fire gets too hot, the quickest fix is to move your coals or raise the grill plate. You can use a fire poker to push the hottest embers to one side, creating a cooler 'safety zone' for your meat to rest. If your unit has an adjustable grill, simply lift it further away from the heat source. This instant temperature control is a huge advantage of 2-in-1 designs like the Bakyard FireFlex.