

How to Use a Rock Tumbler: Beginner's Guide
That handful of dull, dusty stones you found on your last bushwalk could actually be a stash of brilliant, glass-smooth gemstones just waiting to be revealed. Learning how to use a rock tumbler is the secret to turning ordinary river rocks into a bucket of professional-grade treasure. It’s a bit like magic, only with more science and a lot more tumbling.
We understand the hesitation. It’s a big commitment to run a machine for weeks, and the fear of failing at the very last step is real. You might be worried about the constant rumble of a barrel or feel a bit lost when it comes to grit types and ratios. It’s completely normal to want your first batch to be perfect without the guesswork.
This guide will teach you how to master gemstone polishing for professional results right in your own backyard. You’ll turn a simple interest in geology into a deeply relaxing hobby that connects you with the outdoors. We’ve simplified the science of lapidary so you can focus on the excitement of the big reveal.
We’ll cover every essential step, from selecting your starting stones to the final, high-gloss polish. You’ll learn how to organise your stages, manage the noise, and ensure your finished gems are smooth enough to show off to the whole neighbourhood.
Key Takeaways
- Understand how a rotating barrel and abrasive grit mimic years of natural river erosion to reveal the hidden beauty inside rough stones.
- Master the four-stage grit process to learn exactly how to use a rock tumbler for professional, glass-smooth results every time.
- Learn how to select the best stones using the Mohs scale and why adding small "filler" rocks is essential for a flawless finish.
- Discover practical ways to dampen machine noise and the critical steps for disposing of slurry safely without damaging your household drains.
- Start your new hobby with the Bakyard Professional Electric Rock Tumbler Kit, which offers a reliable, quiet setup supported by our Sydney-based team.
Understanding the Basics: How Does a Rock Tumbler Work?
Imagine the smooth pebbles you find on a Tassie beach or in a Victorian riverbed. Those stones didn't start out that way. It took centuries of water and sand grinding against them to wear down the sharp edges. A rock tumbler does exactly the same thing, just much faster. By using a rotating barrel, the machine mimics natural erosion. When you learn how to use a rock tumbler, you’re essentially speeding up geological time in your own shed or backyard.
The real magic happens inside the barrel. It’s a simple but effective combination of water, abrasive grit, and time. This is a classic tumble finishing process where the stones rub against each other and the grit as the barrel turns. While nature takes thousands of years to polish a pebble, a mechanical tumbler can achieve professional results in about a month. You still need a bit of patience, though. You can't rush a good shine, and the steady rhythm of the machine is all part of the hobby's relaxing charm.
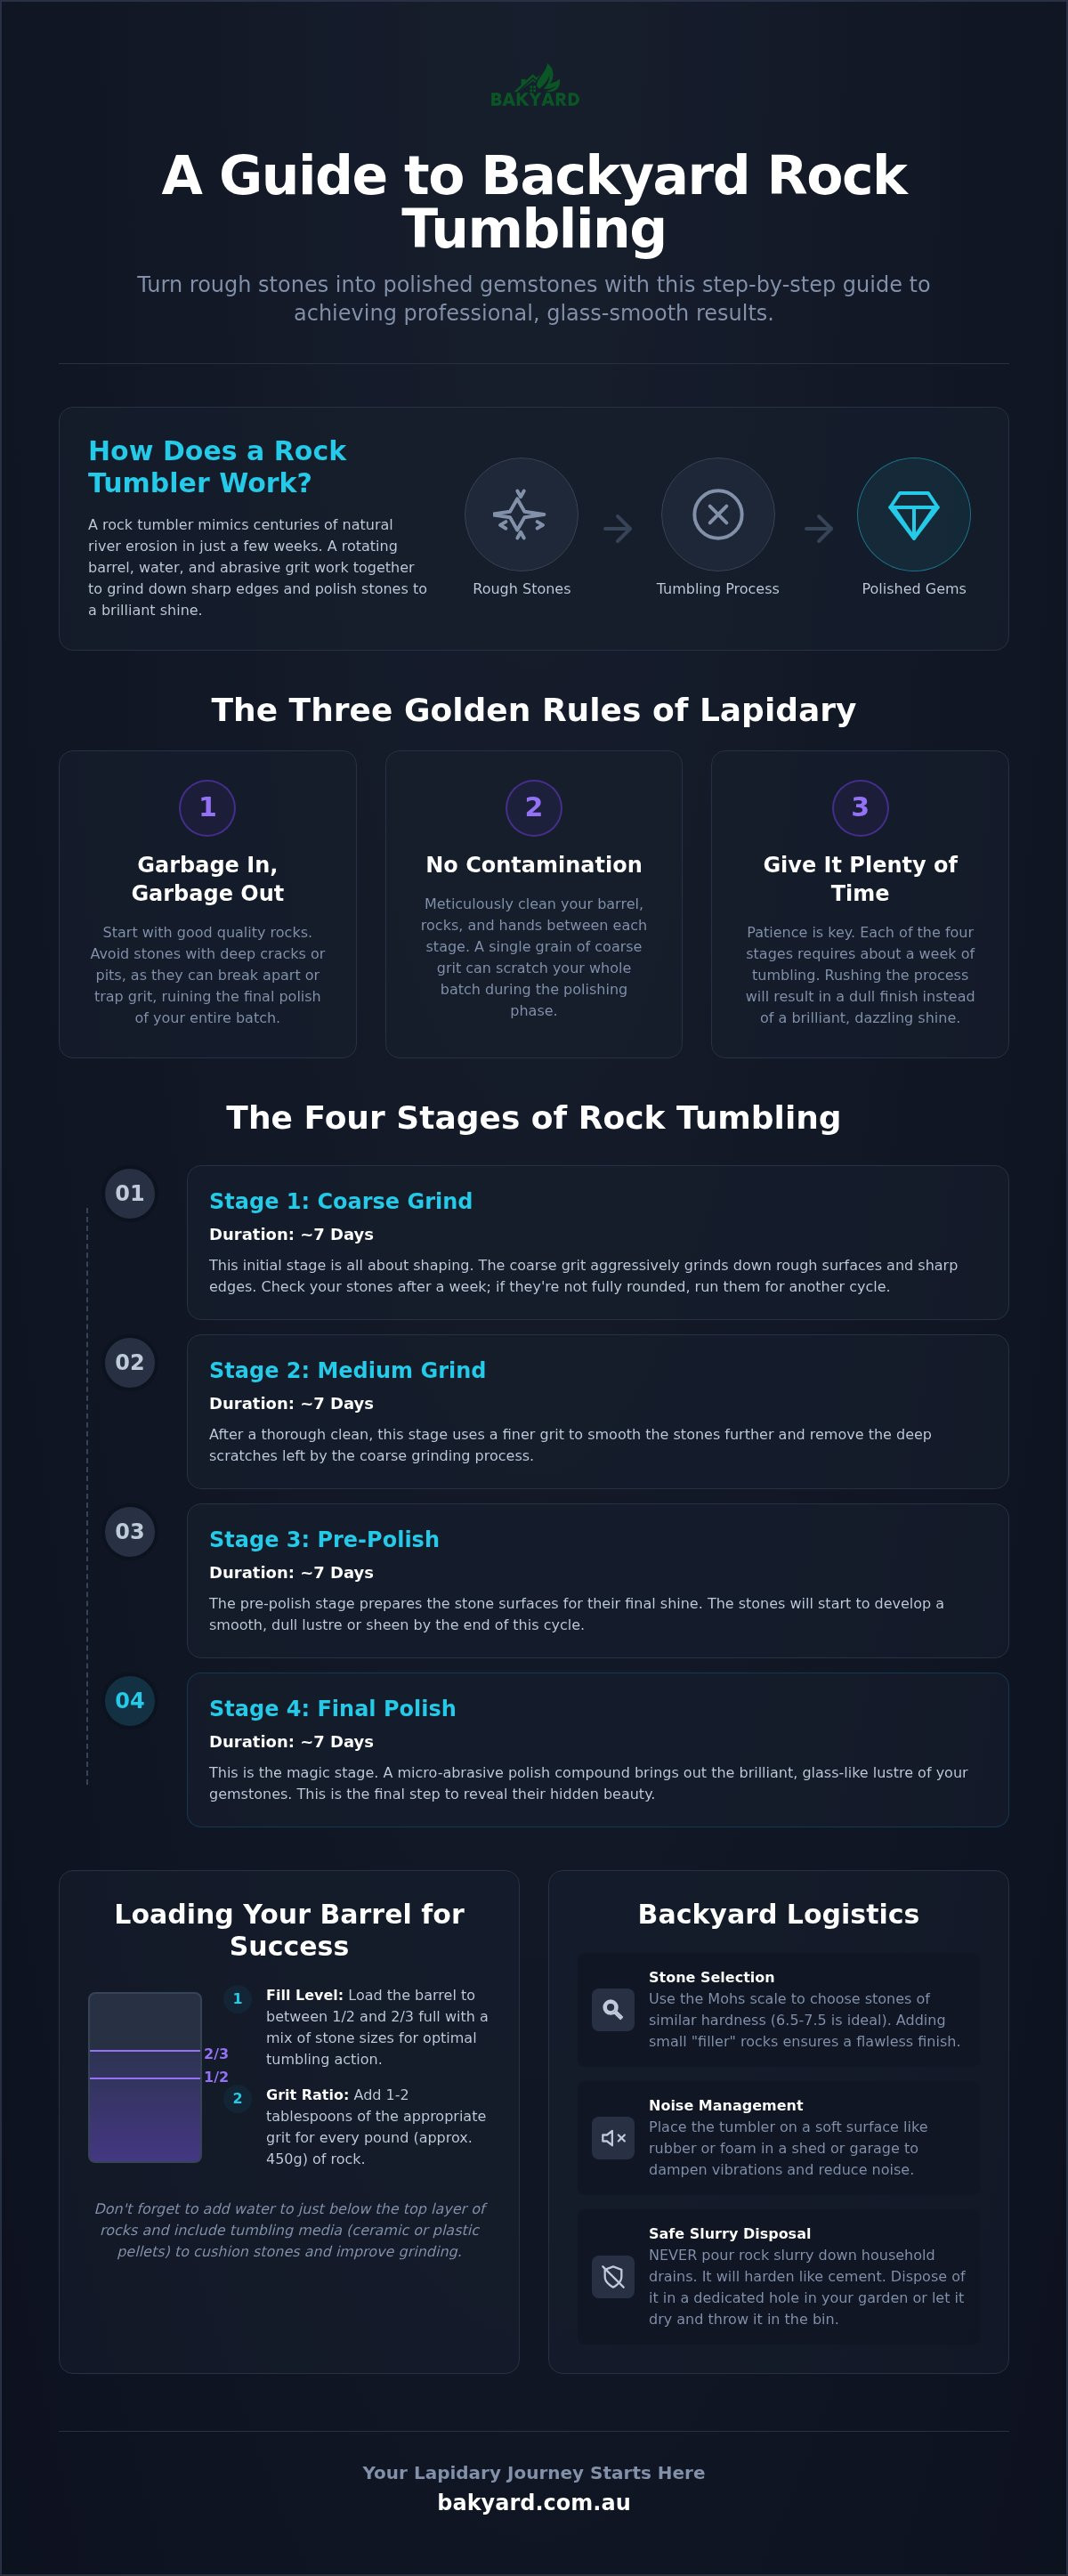
To get the best results, every beginner should follow the three "Golden Rules" of lapidary. First, "garbage in, garbage out" means you shouldn't start with rocks that have deep cracks or pits. If a stone has a nasty fracture, it'll likely break or trap grit that ruins the next stage. Second, "no contamination" is vital. Even one grain of coarse grit left in the barrel during the final polishing stage can scratch your whole batch. Finally, give it "plenty of time". If you cut corners on the duration, your stones will look dull instead of dazzling.
Rotary vs. Vibratory Tumblers: Which is Better?
Most Aussies start their journey with a rotary tumbler. These machines feature a barrel that slowly flips the rocks over and over. It’s the standard choice for beginners because it provides that iconic rounded, "river stone" shape we all love. Vibratory tumblers are faster and keep the stone's original shape, but they’re often louder and more technical. For a reliable and rewarding backyard hobby, a professional-grade rotary kit like the Bakyard Professional Electric Rock Tumbler Kit is the best starting point. It’s designed to be simple to operate and much quieter than the clunky models of the past.
The Essential Gear for Your Lapidary Station
Setting up your station doesn't require a massive workshop. You’ll need the tumbler unit and a high-quality barrel, which acts as the heart of the operation. You also need silicon carbide grit, which usually comes in four distinct stages from coarse to a fine polish. Finally, don't forget your tumbling media. Ceramic or plastic pellets act as a cushion, helping the grit reach every nook and cranny while preventing the stones from "bruising" or chipping as they tumble together. Once you have these basics organised, you’re ready to begin your first batch.
The Four Stages of Rock Tumbling: A Step-by-Step Guide
Getting the most out of your new hobby starts with understanding how to use a rock tumbler properly. Many families treat this as a beginner's rock tumbling activity that everyone can get involved in. To get professional results, you need to follow a disciplined four-stage process. Each stage typically lasts seven days, but the real secret to success is how you set things up before you even flip the switch.
Loading Your Barrel for Success
Don't just dump your rocks in and hope for the best. You need to fill the barrel between 1/2 and 2/3 full for the best tumbling action. If it’s too empty, the rocks will smash and chip. If it’s too full, they won't have enough room to tumble and grind. For every pound of rock, add about 1 to 2 tablespoons of grit. The slurry is the thick, muddy liquid created as water, grit, and rock dust mix together to grind down the stones. This mixture is what does the hard work of smoothing your gems.
Stage-by-Stage Instructions
Stage 1 is the coarse grind. This seven-day cycle is all about shaping your rough stones. When you open the barrel, check that all sharp edges are gone. If they still look jagged, give them another week. Stages 2 and 3 are the medium and pre-polish cycles. These seven-day stretches remove the deep scratches left by the coarse grit and prepare the surface for a shine. Finally, Stage 4 is the polish cycle. This is the last week where the magic happens and your stones develop that brilliant, gemstone lustre. If you're looking for a reliable setup, the Bakyard Professional Electric Rock Tumbler Kit makes tracking these stages simple for everyone.
The Crucial Cleaning Phase
Cleanliness is the most important part of learning how to use a rock tumbler. Between every single stage, you must perform a deep clean or "burnish". Even one tiny speck of coarse grit hiding in a stone's crevice will ruin the entire batch during the final polish stage. Use an old toothbrush to scrub the rocks and the barrel lid thoroughly. It’s a simple task that ensures your final results are flawless and glass-smooth. Once your stones are sparkling, they make the perfect conversation starter while you're relaxing by a Bakyard fire pit on a cool evening.
Choosing the Best Stones for Your First Batch
Selecting the right material is just as important as knowing how to use a rock tumbler properly. You might be tempted to throw in every interesting pebble you found on your last camping trip, but not all stones are suited for the barrel. For the best results, you should aim for stones that sit between 6 and 7 on the Mohs Hardness Scale. This range includes many common minerals that are tough enough to withstand weeks of tumbling without simply grinding away into nothing.
Mixing sizes is another essential secret to a professional finish. You need a combination of large focal stones and plenty of small "filler" rocks. These smaller pieces act as a cushion, carrying the abrasive grit into every nook and cranny of the larger stones. Without them, your big rocks will just bash against each other, leading to bruised edges and a dull, chipped surface. If you want to skip the guesswork, check out our Professional Electric Rock Tumbler Kit which includes a starter set of rough stones specifically chosen for beginner success.
Always avoid "garbage" rough material. If a stone has deep visible fractures or feels naturally porous, it will never take a high polish. These pits trap grit from the earlier stages and release it during the final polish, scratching your entire batch. It’s better to be selective at the start than disappointed after a month of waiting.
Australian Stones Perfect for Tumbling
We are lucky to have some of the world's best tumbling material right here in our own backyard. Agates and Jaspers are the hardy favourites for most Aussies. These colourful stones are abundant in regions like Agate Creek in Queensland or various riverbeds across New South Wales. Petrified Wood is another classic find that tumbles into a beautiful earthy finish, often revealing intricate patterns of the original timber. Quartz is also abundant across the country and remains the most reliable stone for beginners to practise their technique.
How to Test Stone Hardness at Home
You don't need a lab to check if your finds are suitable. The "Scratch Test" is a simple way to gauge hardness. If a steel nail or a piece of glass cannot leave a mark on the stone, it’s likely hard enough for a standard batch. You should never tumble soft stones like Opal or Calcite with harder Quartz. The harder rocks will act like sandpaper, wearing the soft ones down to dust in just a few days. Organising your batches by hardness is a vital part of learning how to use a rock tumbler for consistent, glass-smooth results.
Backyard Logistics: Noise, Maintenance, and Grit Disposal
While the actual tumbling is a "set and forget" process, the physical setup of your station determines whether this hobby remains a relaxing joy or becomes a household headache. Because the machine runs for weeks at a time, finding a spot where the constant rumble won't drive the family crackers is essential. Modern machines have come a long way. For instance, the Bakyard Professional Electric Rock Tumbler is designed to be 75% quieter than many older competitors, making it much easier to live with. However, you still need to think about where that barrel sits and how you handle the waste it produces.
Learning how to use a rock tumbler effectively means managing the machine's needs alongside your daily life. A quick check once a day to ensure the barrel is still spinning freely is usually enough. You should also take a moment to wipe down the exterior rollers to prevent dust buildup, which can cause the barrel to slip or wear out the motor prematurely. This simple bit of maintenance ensures your equipment stays in top shape for years of gemstone hunting.
Disposing of Used Grit Safely
This is the most critical rule for any home lapidary enthusiast: never, under any circumstances, pour your used tumbling slurry down the household sink or drain. This muddy mixture of water, rock dust, and spent grit will harden like concrete inside your pipes. It doesn't matter how much hot water you run after it; the sludge will eventually settle in the U-bend and cause a massive plumbing bill. Instead, always use a bucket system. Pour the barrel contents into a bucket, let the heavy solids settle to the bottom for 24 hours, and then pour the clear water off the top into the garden.
The remaining sludge can be left to dry out and then tossed into the bin. While silicon carbide grit is generally inert and doesn't pose a major environmental threat in small hobbyist quantities, the physical mass of the sludge is the real issue. Some Aussies even choose to bury the wet sludge in a small hole in a quiet corner of the garden where it can eventually become part of the soil.
Where to Set Up Your Tumbling Station
The garage or a sturdy garden shed is the ideal spot for your station. These areas provide the necessary ventilation and keep the sound away from sleeping quarters. To further dampen the vibration, place the unit on a thick piece of old carpet or a foam mat. This stops the sound from echoing off hard concrete floors. If you want a machine that won't disrupt your peace, the Bakyard Professional Electric Rock Tumbler Kit is the perfect choice for Australian backyards because of its whisper-quiet operation and reliable Sydney-backed support.
Starting Your Lapidary Journey with Bakyard Australia
Mastering how to use a rock tumbler is just the beginning of a lifelong passion for lapidary. While the process takes time and a bit of discipline, having the right equipment makes all the difference in your final results. At Bakyard Australia, we’ve designed our kit to take the stress out of the hobby. We want you to focus on the joy of the big reveal rather than worrying about machine failure or missing supplies. It’s about creating a connection with the natural world right from your own backyard.
One of the biggest advantages of choosing our kit is the peace of mind that comes with local support. We provide a one-year Australian warranty on all our tumblers, so you know we stand by our quality. Because we ship free nationwide from our Sydney warehouse, you won't be waiting weeks for your new hobby to arrive. If you ever have a question about your batch or need a bit of advice on your stones, our team is right here in Australia to help you out. We pride ourselves on being a friendly partner in your outdoor creative projects.
What’s Inside the Bakyard Kit?
Our Bakyard Professional Electric Rock Tumbler Kit is built for the long haul. The heart of the kit is a durable, high-torque motor specifically engineered to handle the continuous four-stage tumbling process without overheating. You won’t need to go hunting for extra supplies for your first batch, as we include everything you need to start immediately. Inside the box, you’ll find professional-grade silicon carbide grit packs and a selection of rough stones to practise on. Plus, with fast delivery from our Sydney centre, you can get your first batch tumbling in no time.
Beyond the Tumbler: Enhancing Your Outdoor Space
Once you’ve mastered how to use a rock tumbler and have a bucket full of shiny treasures, the real fun begins. These stones aren't just for sitting in jars on a shelf. Many of our customers use their polished gems to decorate the base of a Bakyard Water Fountain, where the flowing water brings out the deep colours and intricate patterns of the stones. It’s a fantastic way to create a zen-like atmosphere by combining the elements of fire, water, and earth in your backyard. You can also transform your favourites into unique jewellery or thoughtful gifts for friends. To dive even deeper into this rewarding pastime, check out our guide on starting your lapidary hobby in Australia. Join our growing community of Aussie rock hounds and start sharing your brilliant results today.
Start Your Backyard Gemstone Adventure Today
How long does it take to tumble rocks from start to finish?
A full cycle typically takes about four weeks to complete from start to finish. You’ll spend seven days on each of the four distinct stages: coarse, medium, pre-polish, and final polish. While this requires a fair bit of patience, the brilliant results are certainly worth the wait. Some tougher Aussie stones might even need an extra week in the first stage to achieve that perfect rounded shape.
Does a rock tumbler use a lot of electricity?
A rock tumbler uses very little electricity, roughly equivalent to running a small LED light bulb or a low-wattage desk fan. Since the motor is specifically designed for high efficiency and continuous operation, you won't see a massive spike in your household power bill. It’s a very cost-effective hobby for Aussie families looking to enjoy a long-term backyard project without high ongoing running expenses.
Can I put any rocks I find in the garden into the tumbler?
Not every rock is suitable for tumbling, so you should always test your garden finds first. Aim for hard, dense stones like quartz or jasper that don't have any visible cracks or deep pits. Soft rocks like limestone will simply crumble into mud. Understanding how to use a rock tumbler involves selecting materials with a similar hardness to ensure they all polish at the same rate.
Why are my rocks still dull after the final polish stage?
Dullness is usually caused by grit contamination or insufficient tumbling time during the earlier stages. If even one grain of coarse grit survives into the final stage, it will scratch the stones and prevent a shine. It could also be that your stones are too soft or porous to take a polish. Always ensure your rocks are perfectly clean and free of pits before starting the final week.
Is rock tumbling a noisy hobby for the neighbours?
While older machines could be quite loud, modern units like the Bakyard Professional model are designed to be much quieter for residential areas. You’ll still hear a steady, rhythmic hum as the stones tumble. Setting up your station on a piece of foam in a garage or garden shed is the best way to ensure the sound doesn't bother your neighbours or sleeping family members.
What is the best grit to use for a professional finish?
For a professional finish, you must use a four-stage silicon carbide grit system. This starts with a coarse 60/90 grit to shape the stones and progresses through finer stages until you reach a high-grade polishing powder. Using the correct ratios of grit to stone is a fundamental part of learning how to use a rock tumbler to get that glass-smooth, showroom quality gemstone lustre.
How do I clean the tumbler barrel between stages?
Cleaning is the most vital step between each of the four tumbling stages. You should rinse the stones and the barrel thoroughly with fresh water to remove every trace of the previous grit. Many hobbyists run the tumbler for an hour with a little bit of plain soap and water to "burnish" the stones. Use an old toothbrush to scrub out any muddy slurry hiding in the seals.